|
I love to shoot, and I am fortunate that I can shoot in my backyard. Steep hills border my place to the south, and the land rises dramatically along my fence-line. I have a ready-made backstop for bullets. Being safety conscious, I don't have to worry about where my bullets come down. By placing targets at the base of a hill, I can be assured they will bury themselves in the dirt. What I lacked was a suitable target stand. I didn't want to nail into my trees, and I wanted a target stand that would be fairly durable, yet portable enough to move across my land so that I could shoot at varying ranges. I did an Internet search and found some plans for target stands. Some of them looked great and seemed very portable. I intend to construct a portable stand out of square tubing in the near future, but I wanted something I could shoot at today—something durable enough that it would be around for a while, yet portable enough so that moving it wouldn't be much of a chore. Scrounging through the barn, I came upon some pieces of landscape timber that had been used for another project. Two pieces about four feet long and one piece about two feet long seemed about right for what I needed. These timbers are treated, and are guaranteed to last fifteen years in contact with the ground. Some more searching revealed an eight foot piece of 2X2 lumber. Perfect! A Frugal Outdoorsman could use virtually any lumber to construct a stand like this.
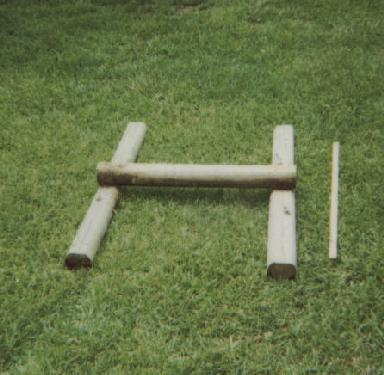
I took the two four foot pieces of landscape timber and put them parallel to each other and used the two foot piece to join them. I screwed the whole thing together with long sheetrock screws. This would serve as the base for the target stand.
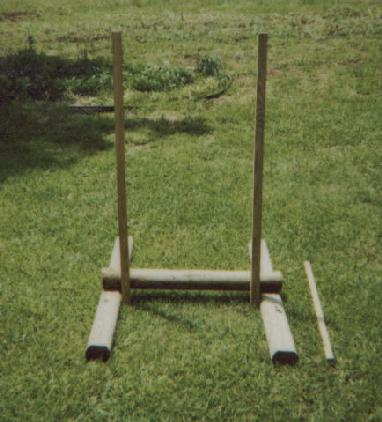
Next, I took the piece of 2X2 and cut it in half, then screwed the four foot pieces to the base, like in the picture. This, then, completes the carpentry portion of the stand.
An old cardboard box was tacked to the uprights of the frame. This cardboard becomes the backing for the target. If you look on the Internet, you can find plenty of targets to download and print from your printer. What does it cost to build something like this? I called the local lumber yard this morning. A treated landscape timber costs $1.99 and a treated 8 ft 2X2 costs $2.29. I already had the fasteners, but a box of screws is about $2.00. For under $10.00 you can build a fine stand. For under $5.00 you can build a serviceable one. Shop around and buy the lumber that suits your budget. Now, all I have to do is carry the stand out to the tree line and go get my rifle. I'm still going to build that target stand out of square tubing, but right now this one ought to do fine.
|