|
After installing scales on the Russell Camp Knife Blade I ordered from Texas Knifemaker's Supply I started thinking about a sheath for it. Here were my requirements:
- The sheath must somehow attach to my belt so I could remove it without removing my belt. It must also attach to my possibles bag.
- The sheath must hang low so I wouldn't have to dig under my coat hem to find the handle.
- The sheath must contain a flattened PVC water pipe section to hold the blade under spring tension and to prevent the sharp edge from touching leather.
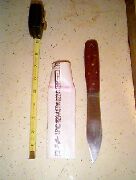
First, I visited my local Ace Hardware Store and tried the knife handle in different sizes of cold water PVC pipe. It fit perfectly in 1" pipe, not too loose and not too tight. A rattle fit, if you know what I mean. So I spent 62¢ for 2 feet of the 1" pipe.
| If you want more information on working with PVC pipe, click here and read a long tutorial about making a PVC sheath for my little saw blade knife. |
At home, I began making the sheath by cutting a section of the pipe about an inch shorter than my knife. That was slightly longer than I needed, but I could trim the extra. Then I drew a red line 2" from one end. Then I put the long end in boiling water for 30 seconds or so, making it pliable, and I then quickly flattened the hot, long end between two boards.
Click thumbnails for full size popup photos.
| Here we see the PVC section after trimming the excess length from the flat end. I trimmed it so that the blade's point didn't protrude.
|
 |
| This photo shows a side view with the knife inserted into the PVC section. I sliced only one side, and I sliced it with a hacksaw blade held in a gloved hand. That was easier than using a Dremel® tool like I did when I made the sheath for my saw blade knife.
The camp knife blade is inserted into the PVC section so that the edge of the blade is against the un-sliced side of the PVC section, eliminating any possibility of cut leather. In other words, when the sheath is finished the knife will fit in only one direction.
|
 |
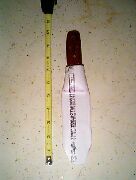
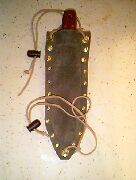
| Here we see the knife fully inserted into the PVC section. The bottom edges of the PVC section have been tapered with a hacksaw. I used a file and rounded all sharp corners and smoothed all rough edges. We're ready to epoxy PVC to leather.
I wanted a double layer of leather about 1" above the PVC in order to hide the white PVC.
|
 |
| This photo shows leather epoxied to PVC and in the process of drying. I simply smeared epoxy on a side of the PVC section and then pressed the leather against it. The double layer of leather extends to the original red line at the top of the flattened section. This particular leather is thin and was originally black. I soaked it in bleach water, and the color changed to brown.
|
 |
| Several hours later, we see the other side ready for epoxy and leather.
|
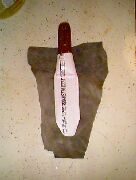 |
| A day later, we see the finished sheath. I installed brass grommets, rivets, and brads, then used scissors and trimmed the excess leather.
The two grommets at the top and the one at the bottom are for attaching leather laces to the sheath. The grommets came in a kit purchased from Walmart and intended for tarpaulins. Note: the hole cutter in my kit cut a hole too large. One tug and material separated from grommet. I used a hole punch and made a hole small enough so that the male end of the grommet was a tight fit through it. and intended for tarpaulins. Note: the hole cutter in my kit cut a hole too large. One tug and material separated from grommet. I used a hole punch and made a hole small enough so that the male end of the grommet was a tight fit through it.
Below the two grommets at the top, where the leather is four layers thick, I used four brass rivets. Below them, where the leather is only two layers thick, I used little three-legged brass brads.
|
 |
LUM MYLES
SADDLE & SHOESHOP
P.O. Box 21
Jena, Louisiana 71342
318-992-5176 |
The rivets and brads came from Lum Myles, a good ol' boy and the local saddle and shoe repairman. He sold me a handful for $3.50.
The black barrel locks used to adjust the leather laces came from Walmart. Called "Decoy Cord Depth Adjusters," they are made by Greenhead Gear and came in a box of 12 for around $3.00.
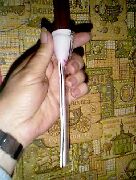
| Here's the finished sheath attached to my belt. By pulling more or less leather lace through the barrel lock I can raise or lower the knife/sheath. With the top laces looped around my belt on both sides of a belt loop, the sheath stays in place and doesn't slide back and forth. As you can see in the photo, I can easily put my hand in my pocket. If the sheath was like a normal sheath, i.e., belt through leather loop, it would block my pocket if mounted on one side of the belt loop, and it would be behind me and difficult to reach if mounted on the other side of the belt loop.
With the bottom lace looped around my leg, the sheath doesn't dangle when I sit down, and it doesn't flop when I run. It stays in place on the side of my leg. If I'm sitting on a stump, etc., the haft is easily grasped by my hand.
|
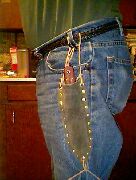 |
The duck bill-like spring tension of the flattened PVC on the knife's blade holds it perfectly. I can turn the knife upside down and shake it free of the sheath only with difficulty. But when I wear the knife and need it, one gentle tug and it is free of the sheath and in my hand. I like it.
The sheath cost me maybe $2.00. The knife cost me about $7.00. Less than $10.00 for knife and sheath. I like that, too.
Copyright 2002 by Junior Doughty
|
)
)
)
)
)
)
)