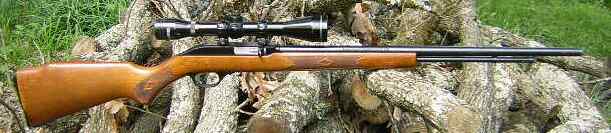
 The only thing I didn't like about the Marlin Model 60 22LR shown above was its Over All Length, OAL, of about 41". Every time I looked at it I wished it was the OAL of a Ruger 10/22 of about 37". Then I started looking at the several inches of barrel you can see sticking out past the knurled knob on the end of the inner magazine tube. It looked to me like I could hacksaw the barrel off just past the knob and shorten the rifle considerably. I posted a question on the www.leverguns.com forum about hacksawing off a rifle barrel, and I received several answers from guys who, basically, said there was nothing to it. So I decided to do it.
Here we see the "Before" end of the barrel. Out of sight to the left, the tape is butted against the start of the receiver, so we see the barrel length of about 21 1/4" total. The broken toothpick shows the location of the factory front sight mounting hole.
I decided to cut off the barrel at the 18 1/4" mark. That would leave me about a 1/2" safety factor in case I butchered the barrel and had to take it to a gunsmith for re-cutting and re-crowning. In spite of what the forum guys said, I wasn't 100 % sure
I removed the inner magazine tube and chucked the barrel in my bench vise. I then took a tubing cutter and scored a line around the barrel, thinking maybe the hacksaw would follow the line and the cut would stay straight. It didn't. The reader can score a line around his barrel if he wants to, but I think it's a waste of time.
Hacksaw time + 10 minutes.
Hacksaw time + 20 minutes.
Hacksaw time + 25 minutes and off came the end of the barrel. The observant will notice that the hacksaw got way off the line. NOTE: Before I took this photo and while the barrel was still in the vice and horizontal, I pushed a patch from the breech end to about 1/2" from the muzzle. That prevented filings from getting down in the barrel and action. When I was through with cutting and re-crowning, I pushed the patch out of the muzzle and took out about 1/2" of filings with it. About 30 minutes work with the file you see here produced a muzzle somewhat perpendicular to the barrel. It was still visibly off, but I didn't think it would matter as long as it was close. I was right, as you will see later. Here we see the file removing the sharp edge around the muzzle.
I then re-crowned the barrel with a little cone shaped grind stone which came with my Dremel® tool. I did not use the Dremel® tool. I used my fingers. As you see in the photo, I simply pushed against the stone slightly and rotated it back and forth with my fingers. Re-crowning took maybe 10 minutes. Basically what the stone did was remove hacksaw blade burrs on the edge of the lands and put a slight bevel on the edge of the lands, helping prevent handling dings.
Here's the final result. (The knurled knob on the left looks even with the muzzle, but it isn't.) Notice a few file marks remaining. Hey, I said I wasn't after pretty. This photo was taken after firing probably 50 rounds through the new muzzle. Thus, the lube/carbon star around the bore.
Here's the "After" end of the barrel. Notice it's just past the knurled knob.
Now we need to look at the "Before" and "After" muzzle velocities and 25 yard grouping results. The black squares are 1/2" X 1/2" in size. Here's "Before":
Here's "After":
There was absolutely no difference in the rifle's accuracy and muzzle velocities before and after the hacksaw job. However, I did encounter what could have been a major problem. About 1 round in 10 failed to eject and caused a jam. I neglected to consider the blow-back action's need for the 3" of barrel I cut off. The shorter barrel cut a few milliseconds off the pressure/time curve. In other words, pressure dropped to zero and the bolt still needed to move backwards a slight amount.
This photo shows the recoil spring, the cut-off section, and the recoil spring guide. I now have a squirrel rifle which will be much handier in the woods.
I must close with a repeat of my earlier warning:
|
)
)
)
)
)
)
)
)
)
)
)
)