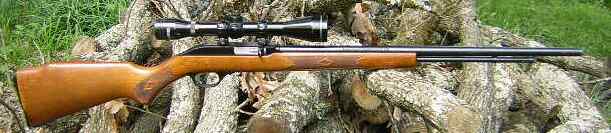
 A look through a loupe at the rifling just below the muzzle crown showed zero cleaning rod wear. The rifle had one little rust spot on the barrel and a couple of small dings in the stock. For $110 cash, it followed me home. After zeroing the scope, I checked it for accuracy and function. It put 5 shots @ 25 yards in or touching a 1/2" square. It fired 20+ rounds without failure. It was a keeper, for sure. I decided to take it apart to clean it and to check for internal wear. I consulted with my pard, Dennis Dezendorf, as he owned a Marlin Model 60. He gave a couple of simple directions which I found too easy to be true. Then I went to the Brownells site for a look at a schematic and a check of available parts. Lo and behold, Brownells sells every part that could possibly break on a Marlin Model 60 except for the barrel and the receiver. For the purpose of this tutorial I have listed the Brownells name and retail price for each part. I did that easily because I saved the proper Brownells schematic web page to my computer's desktop. Offline, I can open the page and there's the schematic and the parts listing. You should do the same. An exploded view is handy when trying to put something back together. Hint hint. In Internet Explorer, in the upper left-hand corner of the window click "File." When the tab opens, click "Save As. . . ." and save the web page to your desktop or wherever. (Don't worry. The only thing actually on your desktop will be a little clickable icon.) My pard, Dennis, was right, I soon discovered. Not only was takedown easy, you can totally disassemble a Marlin Model 60 with one screwdriver.
The numbers are the Brownells schematic numbers.
I began with the chamber empty, the hammer cocked, and the bolt all the way forward. We start with removal of the inner magazine tube. (# 35: Magazine Tube Assembly, Inner, $19.93.) Just pull it out the top of the magazine tube.
Remove the numbered screws. (# 58: Take Down Screw, Front, $5.20.) (# 59: Take Down Screw, Rear, $3.85.) The screw at the front of the trigger guard stays in place. (# 62: Trigger Guard Screw, Front, #2.68 or $2.73.)
The phillips head screw to the right stays in place.
Pull the stock up, and off it comes.
The trigger and safety stay in the trigger guard.
Pull out the assembly post. Mine came out with just my fingers. You might have to give yours a nudge on the bottom. It's plastic, so don't hit it with a punch.
When the assembly post comes out, the rear of the hammer mechanism pops up. Pull it backwards, freeing the two little ears at its front, and off it comes.
Here, we're looking down into the receiver at the bolt and the compressed recoil spring. At the top right see the assembly post. At the bottom, see the hammer mechanism.
Now, let's remove the bolt. Pull it rearward at least 1/4". Then push down on the rear of the bolt with your thumb, as shown. The bolt's front should rise out of the receiver slightly, freeing the charging handle. (# 14: Charging Handle, $7.36.)
Here we see me holding the charging handle, and we see the front of the bolt in a slight upward position. The charging handle simply falls out.
The bolt is under tension of the recoil spring, so hold it tightly. Then pull it out of the receiver.
Here we see the bolt, and above it we see the recoil spring with the recoil spring guide inside it. (# 39: Recoil Spring, $5.29.) We're finished. The internal parts of my Model 60 showed very little wear. I carefully cleaned the innards, using oil and a rag on the receiver and the bolt, and oil and Q-tips on the hammer mechanism. Reassemble in reverse order. The only halfway tricky part comes when reinstalling the bolt against the tension of the recoil spring. I swear: my Marlin Model 60 is the easiest firearm to disassemble and reassemble I've ever owned.
It should also never require the services of a gunsmith to repair. Counting the recoil spring and the five springs shown here, there's a total of six springs within the rifle. Chances are a failure would be due to one of those springs breaking, probably one of these five. They are, from left to right:
) This closeup shows some of the C-clips holding pins in place in the hammer mechanism. To change a spring, pop a C-clip off, push the pin partially out, then replace the spring. It's almost too simple. Now I understand why Marlin has sold more than 11 million of these .22 rifles. NOTE: In some hammer mechanisms the pins are permanently attached to one side.
|
)
)
)
)
)
)
)
)
)
)
)