Copyright 2006 by Junior Doughty
Click here for the first article about my Turk Mauser.
Click thumbnails for full size photos
(1) I drilled and tapped three scope mount holes, (2) removed the military safety and replaced it with a low-mounted safety, and (3) performed major surgery on the military bolt handle. All three projects were easily within the capabilities of a home gunsmith with a drill press, the proper drills & taps, a hacksaw, a file, and a propane blow torch and some low-temp solder. Oh! And a Dremel® tool. The fact that I owned several other woods rifles, no long range deer rifle, and had access to a pipeline reinforced the conversion decision. But before we start the conversion, let's look at the loads I planned to use. From work with the rifle in scout rifle mode, I had decided on two loads and two bullets—the Nosler 180 gr Ballistic Tip and the Remington 185 gr PSPCL. First, I did a weight analysis of both bullets. The Noslers needed no analysis as they all weighed between 179.95 grs and 179.9 grs or .04 grs total variation. That's unbelievable uniformity. The Remingtons averaged 186.17 grs and varied between 185.6 and 186.7 grs or 1.1 grs total variation. That's fine for hunting, but from now on when I buy bullets for shooting small groups I'm buying Noslers. Cases were R-P 8x57 Mauser neck sized; primers were CCI LR. The loads were:
Reduce before using my S4895 loads! If you use IMR4895 or H4895 and don't reduce and work up, you're a damn fool. (No, I don't know where you can get some S4895.) I decided to use mostly the Remington 185 gr bullet as it was 1/2 the cost of the Nosler 180 gr Ballistic Tip—about $16 per 100 vs about $16 per 50. But the Noslers were like a box of copper jewels. And they had a tendency to put two of three shots touching at 100 yards, even with the pitiful 3X scout scope. There's more work ahead for those bullets! Before I loaded the first round I determined the COAL to the lands with both bullets. I did that by partially neck-sizing a case and starting a bullet just enough to stay in the neck. I then chambered the rounds with the bolt and let the lands seat the bullet. Then I measured the total length of each round. Note: seated to the lands, the bases of both bullets barely traveled halfway down the case neck. That's another pressure factor to consider if you duplicate my loads.
Note: loaded to those COALs both rounds fed perfectly from the magazine. With a bullet POI ~ 2" high at 100 yards (zero = 175 yards) both bullets are ~ 2" low at 200 yards, and ~ 4" low at 225 yards, and about 7" low at 250 yards. All I have to remember is 2, 4, 7, and all I had to do was put some red surveyor tape on the pipeline at 250 yards—which happens to be very near the maximum shot range on my pipeline stand. If a deer is at or just past the tape, aim a little high of center. If it is on my side of the tape, aim for center. Easy!
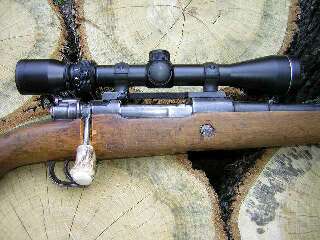
Installing the mount and adjusting the scopeI installed the mount and scope first because the purpose of both new safety installation and bolt handle alteration is scope clearance. I saved my expensive Redfield Widefield and bought a $30 Tasco 3X9 at Wal-MartI carefully followed the instructions on Steve Wagner's Mauser pages and drilled and tapped the rifle's action. I used a #31 carbide drill and bottom and taper 6-48 carbon taps. (Sold by me at the links.) Note: the carbide drill bit was the sharpest drill bit I've ever used. It cut through my Mauser action steel like a normal bit cuts through wood. I'm not exaggerating. If you don't go slow and measure your hole depth frequently, especially the two holes over the chamber, you'll find yourself with a ruined rifle. The bit is expensive, but it's worth every penny. The mount installed and the screws snugged just a little over finger tight, I performed a step some would consider off-the-wall. Via a grinding stone in my Dremel® tool, I adjusted the mount so that it almost exactly aligned with the bore. In my considerable experience with cheap scopes, their main problem comes with the major windage and elevation adjustments required during initial installation. You crank the elevation screw down 40 clicks, and the crosshairs move sideways. Move the windage screw, and the crosshairs move up or down. Sometimes it's exasperating trying to adjust a cheap scope. At $30 brand new, my Tasco was a cheap scope. Here's what I did:
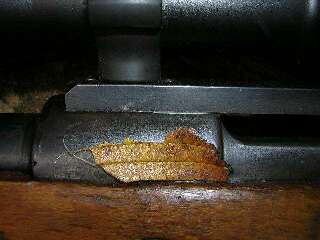
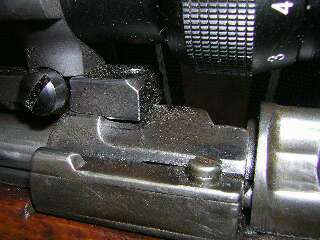
As this photo of the front of the mount shows, I also glued the mount to the rifle with J&B Weld. (The leaf section hides the serial number.)
In addition to its glue function, the J&B Weld fills all the low spots and makes for a perfect mount to action junction.
See the stripper clip hump with the mount on top? At the hump's rear on the upward sloping area, I used a file and made a small vertical wall. Then I did the same to a corresponding spot under the mount. The two vertical mating surfaces act like a recoil lug and reduce sheer forces on the 6-48 mounting screws. Unnecessary, you say? Maybe so, but all it cost was a few minutes of work. There's also J&B Weld between the two surfaces making them a perfect match. This scope mount ain't shooting loose!
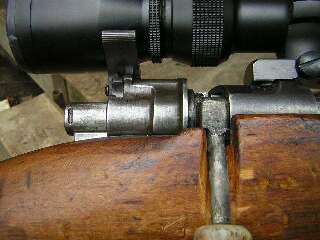
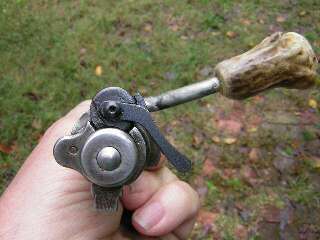
There's two kinds of after-market Mauser safeties. This kind, which, like the factory safety, physically blocks the firing pin and prevents it from moving forward; and the other kind, which prevents the trigger from being pulled. This one requires a little skill and a little file work to install. However, I easily installed it using good instructions found on Steve Wagner's Mauser pages. There's also instructions on http://www.surplusrifle.com The little sheet of confusing instructions which came with the safety are almost useless. The photo above shows the safety in the "On" position. It looks like it touches the bell of the scope, but it doesn't although it is close. If it did touch the bell, I'd simply move the scope rearward, lessening the eye relief—which I need to do anyway as I set it while wearing a t-shirt. When I'm wearing hunting clothes, the eye relief is about 1/2" too much.
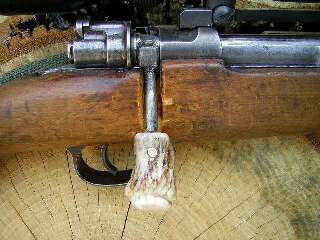
Via instructions on Steve Wagner's Mauser pages I drilled the old bolt handle and soldered in a 1/4" bolt. Notice the notched out stock. There's a much smaller, hidden notch in the side of the action and made with a round file. If I ever alter another Mauser bolt I'll drill and tap the rifle bolt for a 1/4" bolt. Coat the threads with J&B Weld, and I think it would hold as well as solder.
Here's a look at the top of the bolt showing the solder filled hole. The new safety is in the "Off" position.
The finish isn't exactly a Browning finish, but guess what? I don't care.
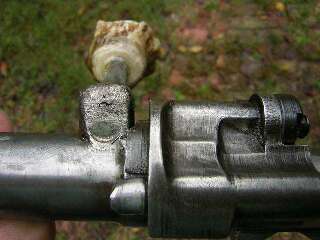
Here's a rear look at the new safety in the "Off" position.
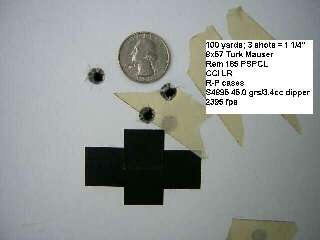
I don't know about you, but I like the antler base bolt knob. Well, it was time to zero the rife for the upcoming deer season. I headed to the local public range because it had both 100 yard and 200 yard target frames. I was curious to see how this $63 marvel would group at 200 yards with its new 3X9 scope. With a POI of +2" at 100 yards, both the Nosler and the Remington bullets should be -2" at 200 yards, according to the computer. I neglected to consider the upcoming deer season. About a dozen 20-somethings were using all three benches. After a few minutes they vacated one of the benches and I placed my rifle and equipment on it. They were all shooting various and sundry expensive bolt actions with the exception of a single Handi-Rifle in 243 Winchester. One guy had an unbelievably loud 300 mag which easily cost $2,000 or more—a stainless barrel, composite stock, big ol' Leupold scope. . . . I unzipped my Mauser's case and all eyes cast in my direction. Several of the guys walked over for a look. I showed them how I hacksawed off the barrel and stock and explained that I had $63 total in the rifle, not counting the safety, the scope, and the scope mount. I can best describe their reactions as sympathetic. During a break in their firing, I installed my target board at 100 yards and upon asking why there was no 200 yard frame, was informed that it had been shot to pieces. In short order my Mauser was zeroed about 1 1/2" high at 100 yards, and I began shooting 3-shot groups for record. It was extremely difficult to shoot groups with cannons firing just a few feet away. After a while I noticed that most of the cannoneers were looking through their scopes at my groups. Here's the last of two 100 yard groups fired with the 185 Remington. The one preceding it also measured 1 1/4". After shooting this group I shot one with the Nosler, but for some dumb reason I had brought only two rounds loaded with the Nosler 180 BT. The 2-shot group measured 3/4" and shot to the same POI as the Remington 185—exactly 1 1/2" above the center of the big black X. I was very happy with the way my Mauser shot using the 3X9 scope. I gave the elevation knob two clicks "Up" to make the zero exactly 2" high at 100 yards. I suspected getting away from the cannons and using weighed charges instead of dipped charges, I could get 1/2", 3-shot, 100 yard groups with the Nosler BT. After putting my $63 rifle away, I made small talk with the group around me and inquired as to the size of their groups. Silence. The guy with the big $2,000 cannon had spent all afternoon twiddling with his scope adjustments. I had asked him what he was doing. "Trying to get it two inches low at 100 yards so it'll be on at 200 yards," he informed me. I said, "Huh? I'd zero that thang two inches high at 100 yards, and it would probably be on at 225 or maybe even 250 yards." "Nope," he said. "The bullet is rising at 100 yards and still rising at 200 yards. Two inches low at 100 and it's on at 200 because of the rise." I wanted to say something, but I kept my cool and didn't. On the way back from the 100 yard target frames I asked him what size groups he was getting. He held out his hands and made a circle about the size of a volleyball.
A hunting taleThe crack of dawn a couple of weeks later found me sitting on my pipeline stand. I call it the "dogleg stand" because it's behind a marker pole where the pipeline makes a dogleg to the left. I don't like elevated stands. Never have, never will. This particular morning I had carried with me a wrist-size stick and a couple of feet of wire. I sat down on my five-gallon bucket seat behind the pole, and I wired the stick to the side of the pole so that my rifle would rest on top of the stick and against the pole. I tried it, and it worked like a charm. The rifle resting and me aiming in the dim morning light down the pipeline and toward my 250 yard red surveyor tape marker, the crosshairs were steady, the red tape gone. Huh? I guess a deer ate it, I mused.A creek ran across the pipeline in front of me and through the middle of a little valley. Just across the other side of the creek was a measured 100 yards. In previous hunts, I'd seen many does cross that spot. As the pipeline was in dire need of bush-hogging, the shooting lane was only one 4-wheeler wide. With the very same rifle in its scout scope mode, I'd missed one of those does as she stood in the middle of the narrow lane looking at me. I ran some string from the post to a nearby bush and hung branches from the string, hiding myself from anything walking out on the pipeline ahead of me. It was a good blind/ground stand, I decided. Along about then I looked up toward the missing 250 yard marker, and saw a doe strolling across the pipeline. She was legal game. As my rifle was leaning against the pole, butt on the ground, by the time I got it raised and aimed the doe was gone. About 30 seconds later and me with the rifle up and ready, the same doe or her twin dashed back across the pipeline. No way did I have time to aim and fire.
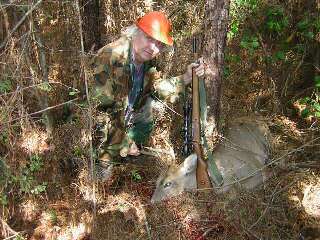
While I debated myself he turned his path slightly to his left. I aimed between his front legs, low, and fired, expecting the bullet to exit low in his left shoulder and miss his abdominal cavity. The range was 20 yards. He leaped into the woods, dragging his left front leg. I found him a few yards away and as you see him here. You couldn't ask for better performance from a bullet than the Remington 185 gr PSPCL gave me. It liquified the buck's heart and lungs and held together enough to blow a 2" diameter hole through the buck's left shoulder, low, breaking the leg and exiting. And you couldn't ask for better performance from a $63 rifle with a $30 scope.
|
