Copyright 2006 by Junior Doughty
Click here for the second article about my Turk Mauser.
Click thumbnails for full size photos
I was hanging around the Cast Boolits Military Rifle Forum and someone posted about his dirt cheap 1938 Turk Mauser 98 and how great it shot. Then someone else posted about J & G Sales selling them for $64.95 each. Fresh in my mind was the sub-MOA groups shot by my $50 Spanish Mauser 93 7x57mm "Boat Rifle." So I looked closely at the 1938 Turk 98 and the ballistics of its 8x57mm chambering.
I had no delusions of lucking into another war hoss rifle which would shoot sub-MOA 3 shot, 100 yard groups. I figured the Turk would probably shoot 3" groups on a good day and 6" groups on a bad day with most groups in between. Thus, the decision to go the scout scope route and make myself another short range woods rifle when I already owned 3—the 7x57mm Boat Rifle, a M92 Rossi 357 mag carbine, and a M94 30-30 carbine. What tha heck? You can't have too many rifles! So I went to the J & G Sales web site and instead of ordering one 38 Turk Mauser for $64.95, I ordered two for $59.95 each. What tha heck? I'd have a complete rifle for spare parts! I had them shipped to my dealer, Carl at Blade 'n' Barrel in Jena, Louisiana. When Carl opened the shipping boxes in order to check the serial numbers, he took one look at the greasy mess inside the boxes, wrinkled his nose, and said, "Yuck." His momma, the real boss, said, "Y'all better not get any of that grease on my counter."
Back at home, I picked the rifle which seemed coated with the least amount of cosmoline, and I put the other one aside for another day. The http://www.surplusrifle.com site had a page on cosmoline removal, so I studied it carefully. Then I put the chosen rifle back inside its shipping box and put the box in the trunk of my car. Then I moved the car in the sun and left it there for a couple of hours. The heat in the trunk softened the cosmoline, and I wiped the rifle's exterior with rags. Now I could at least see the take-down screws. But take-down wasn't easy.
NOTE: probably due to the stock being attached to the barrel with a peened cross pin, the Turkish soldiers who originally carried my rifle seldom or never removed the barreled action from the stock for cleaning. I found hidden and caked Turkish dirt everywhere, including inside the firing pin channel of the bolt. In some places, the caked dirt was like baked-on brick and had to be chiseled off.
HOWEVER: I found not one speck of rust and nary a rust pit on the metal parts hidden inside the stock. You might not be so lucky. If your action or barrel has rust pits, take it to a gunsmith before you shoot it! I had expected pitting from corrosive primers. But the Turk army was and is extremely disciplined so the soldiers who used my rifle obviously cleaned it after each firing. When I mentioned this on the phone to "Andrew" at J & G Sales, he told me, "We've sold thousands of Turk rifles, and I can only remember a couple with bad bores."
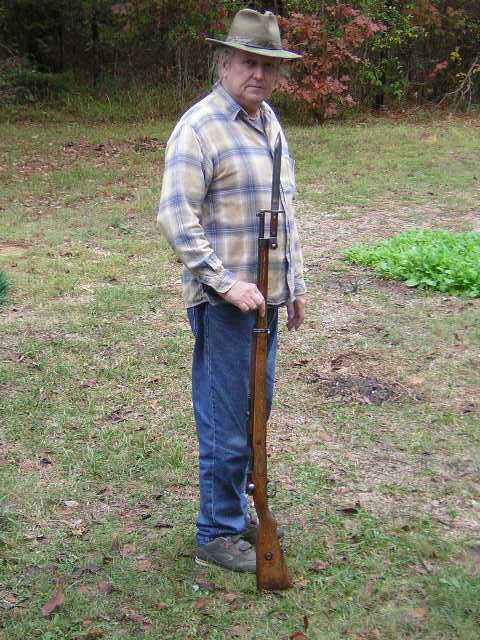
I put the Turk back together and posed for this photo. The observant will notice the missing cleaning rod. I forgot to reinstall it. (That's a turnip patch on the right.) The $59.95 cost of the rifle included the bayonet you see here plus its scabbard. It isn't for sale, but I think I could easily sell it for $20 which would make the initial cost of the rifle a mere $39.95. The blade is very thick, so maybe I'll find a use for it. Plus I have another one soaked in cosmoline!
This "Before" photo shows the Turk's barrel area, the part which received the most alteration or "butchering" as purists will surely say. I hacksawed the barrel off to 20" or to a point exactly 6" from the center of the lower barrel band. To learn how to hacksaw off a rifle barrel, click here.
I could have discarded the barrel band and used a clamp-on sling swivel stud out on the barrel. But I liked the barrel band and its built-in sling attachment. Plus I would have to deal with the wooden ledge just to the right of the band. So I decided to chop off the barrel band even with the top of the stock. I could use the original Turk cross pin and reinforce the pin and the band with epoxy.
With a hacksaw and a file, I cut gouges in the wood beneath the band in order to give the epoxy a bite. To give the epoxy a bite in the metal of the band, I cut gouges in it with a Dremel ® tool cut-off wheel.
This photo shows the band epoxied in place. You can't see it, but the Turk cross pin is also epoxied in place.
In the barrel channel to the left, see the cut-off top of the band. In the barrel channel to the right, see the steel military cleaning rod epoxied in place all the way down the barrel channel to the little nut into which it's tightened. This barrel redefines stiff.
This is the end of the cut-off stock showing the cut-off cleaning rod before epoxy. No, I didn't fill it with wood to hide it. I filled it with epoxy, and you can still see the end of the cleaning rod. So what?
I cut the rod off a little short, and I hacksawed a screwdriver slot in the end so I could tighten it. Let's go to the action area of the stock and some bad news.
Well, I don't trust long-ago glue, so I reinforced the stock with cross pins epoxied in place. (Below, we'll investigate and fix what caused the original split.)
IMPORTANT: I drilled the hole slightly larger than the nail. Epoxy filled the difference; thus giving the stock zero extra stress. The hole drilled and the nail tested for loose fit, I filled the hole with epoxy and slid the nail inside it, wiping off the excess epoxy pooling at the surface. Not trusting the old repair at all, I installed another cross pin behind the brass pillar. In other words, I installed cross pins on both sides of the brass pillar.
NOTE: I sell brass, aluminum and stainless steel cross pin rods in 12" lengths and several diameters here. The same split extended through the magazine well and into the wood behind the metal crossbolt. So I installed a cross pin through the stock there, too. I couldn't find another galvanized nail, so I used a brass pin. Note the cuts in the pin to give the epoxy a place to bite. Note the hole ready for epoxy. The rifle ended up with three added cross pins. The stock splitting is over. Let's look at why it split.
To the right of the hole, we see the rectangular-shaped crossbolt, against which the recoil lug fits and expends its energy. (My added brass cross pin would be about 1/2" off the right edge of the photo and hidden inside the chunk of wood against which the crossbolt butts.) But wait. Something isn't right. This rifle has surely fired 100s if not 1000s of rounds, and the bottom of the recoil lug well and the surface of the crossbolt show no wear at all. I probably caused the slight wear on the left edge of the crossbolt when I removed the barreled action from the stock several times. What's going on? The recoil lug on the barrel wasn't even close to touching either the bottom of the well or the crossbolt, that's what's going on. Here's what caused the split stock: The trigger guard was a tight fit in the stock. When the rifle was fired, backwards recoil of the barreled action, recoil to the right in the photos, did not expend its energy against the well-braced crossbolt. Instead, it kicked the trigger guard backwards against the stock and eventually split it. That also explains why the front trigger guard screw was bent and almost impossible to turn. The head of the screw was a tight fit inside the trigger guard. When the Turk armorer fixed the split stock, the trigger guard became rigid, unmoving. So the barreled action moved backwards with the recoil. With the front screw's head rigid and its tip in the recoil lug and repeatedly pounded backwards due to recoil, it bent.
The rear trigger guard screw didn't bend, maybe due to its longer, more flexible length. Whatever the case, my front screw was unusable. J & G Sales removed one from a parts Turk and sent it to me. It was slightly bent. Back on the forums, several other guys with 38 Turk rifles had front screws which removed with difficulty. Remember all this if you buy a 38 Turk. I straightened the slightly bent screw J & G sent me via screwing it into the recoil lug and giving the head a couple of hammer taps against the bend. To be safe, I ordered a Forster set. They fit perfectly, so I'll keep them just in case I need them on the other rifle, the one still in cosmoline.
I'm betting there was a 1/32" gap between the recoil lug and the crossbolt, maybe more. And the front pillar wasn't touching the bottom of the recoil lug as it should have. Both of these photos also show the steel cleaning rod now a part of the stock. It took lots of epoxy to fill that long narrow hole.
With the Dremel® tool, I made many deep gouges in the metal cross bolt, in the wood behind it, and in the recoil lug well. I filled them all with J&B Weld. To prevent the action from sticking, I gave it a light coat of . . . drum roll please. . . . Junior Lube! I free-floated the barrel all the way from about 1" to the left of the cleaning rod nut to the end of the forearm.
After the J&B Weld had a full day to dry, I used plain ol' Wal-Mart This area contained a bunch of black, rotted-looking wood. Maybe it was only stained, but I took no chances. Using the Dremel® tool like a dental drill, I gouged out huge chunks of it. It's all filled with epoxy now and very, very solid. Let's mount the scope!
I had to do a little file work on the front of the military sight, but that took only a couple of minutes and was no big deal. BUT the two large, vertical tension screws were held tight by little lock screws accessible via tiny holes in each end of the mount. I ain't positive and I threw away the instructions, but I don't think they said a word about those two little lock screws.
I mounted the mount and got it tight as a drum. I mounted the scope and started shooting adjustment The next day, still mad, I took the scope and mount off the rifle in preparation for Plan B, whatever it might be. Sure wasn't gonna be a B as in B-Square. I took off the mount, and that's when I saw the tiny holes in each end. Hmmm, wonder what those are for? Sure enough, there was an Allen screw down in each hole. B-Square, I'm sorry I said bad things about y'all! I remounted the mount, tightened the Allen screws, and the scope hasn't budged since. Only complaint I have is the scope is all the way forward, and I need 1" more eye relief. But a recoil pad will take care of that, I figure.
From muzzle to buttplate, it's exactly 39 3/4" long. Empty and with the scope and the homemade sling attached, it weighs 8 lbs 13 oz. Add five rounds of ammo and the total comes to 9 lbs 2 oz. That's heavy for a woods rifle, no doubt about it But it's a powerful woods rifle. With a 200 gr bullet at 2300 fps at the muzzle, it has 1876 fp of energy at 100 yards and over 1000 fp of energy remaining at 425 yards.
One thing to think about—with a full power 8x57 On the right, see me and the Turk in the deep woods on an actual deer hunt. The camera is on "Timer" and is tied to a bush. The Turk is attached to one of my saddle ring slings clipped to the rear sling swivel. The thing dangling at my left side is the camera bag and a 3-legged fold-up stool all attached to another saddle ring sling. The thing just to the right of the Turk's bolt is a canteen made from a 20 oz soft drink bottle.
My Turk is too heavy and powerful for an ideal woods rifle unless you hunt woods wherein lurk big hairy animals who might eat you for dinner. For example, it has about 50% more muzzle energy than a
One thing for sure—it is a dirt cheap woods rifle. The cost, not counting scope mounts and scope, was:
Borrow or buy a No-Go headspace gauge. The link at the beginning of this article will take you straight to Brownells where you can buy one.
This photo shows my Turk's bolt closed on my Just fit the rim of the gauge in the bolt—it's a little tricky—and close the bolt gently. Don't force it! Firing pin protrusion and wear
This firing pin, on my Turk, protrudes about .055". The tolerance is between .055" and .065". Low, you might get misfires. High, you might get pierced primers. Look at your firing pin with a magnifying glass, and make sure it is round like this one. Flat spots mean someone worked on it with a file. Flat spots have sharp edges which might pierce primers. Check your bolt face and your firing pin for pitting caused by leaky corrosive primers. A little bolt face pitting is ok, but firing pin pitting gives sharp edges which might pierce primers. Brownells sells Mauser firing pins. So does eBay. Speaking of pierced primers. . . .
Here we see a 93 bolt on the left and a 98 bolt on the right. We're looking at the bottoms of the bolts. Notice the two cut outs on the 98 bolt. They extend into the firing pin channel. If that bolt's firing pin pierces a primer, most if not all of the hot gasses go through those two cut outs and safely down through the magazine well. If the 93 pierces a primer, most of the hot gasses go. . . . in your eye. . . . The 93 bolt has two locking lugs near the head. The 98 bolt has two locking lugs near the head and a safety lug at the back. That's it on the left side near the bottom edge of the stick of firewood. Now you know why I shoot only light to medium loads in my Mauser 93. How does the Turk shoot? Glad you asked—very dang well, that's how! Especially when you consider the scope is only a 3x with a built-in parallax setting of 50 yards!
The Turk can easily push the 185 gr Remington SP to 2350 to 2400 fps with Varget. I also shot a few groups with the 200 gr Speer SP at 2256 fps. The Turk can push it to 2400 FPS. All jacketed 3-shot groups ranged from 1 1/2" to 2 1/2" with many putting 2 shots touching with a flier opening up the group. This $63 rifle is a shooter.
The Turk presented me with a dilemma—it wasn't supposed to shoot so well. And it was too dang heavy to pack around in the thickets. And I had a 3-9 Redfield Widefield gathering dust in a closet. And I didn't own a pipeline rifle. And I had access to a pipeline. So . . . before deer season 2006 - 2007, off comes the B-Square mount and the 3x pistol scope and on goes the 3-9 Widefield. And we'll have another article sooner or later. . . .
It's the high Ballistic Coefficient Sierra 175 gr SP at 2600 fps which is easily reached in the Turk. Zeroed at 175 yards, it is point blank range on a deer to 225 yards, and it has 1504 fp of energy remaining at 300 yards. All I'll have to do is mark the pipeline at 250 and 300 yards, and I will have myself a dandy 300 yard pipeline rifle—for $63.00. Well . . . I'll have to buy either a new safety or a trigger with a safety on it. Another $40 maybe. Dang.
|
)
)
)
)
)
)
)
)
)
)
 This graphic shows it better than I can explain it. The front pillar is not shown. The red arrow shows the direction of recoil force. Imagine the trigger guard rigid and unmoving. Imagine the front screw held rigidly in a vertical position due to the tight fit of its head inside the trigger guard. With the recoil lug touching nothing, the barreled action moves sharply to the rear when the rifle is fired. In other words, the front trigger guard screw served as a recoil lug. Over time, it bent into a slight "C" shape.
)
)
)
)
)
)
)
)
)
)
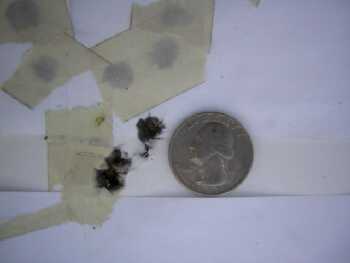 This cast bullet group photo is actual size and not clickable.
 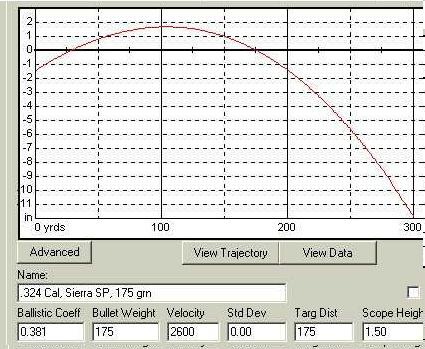 Here's a screen capture from my ballistic program.