(Click here for the second article.)
(Click here for the third article.)
(Click here for the fourth article.)
Copyright 2006 - 2014 by Junior Doughty
Click small photos for full size photos
As I've stated before here in the Frugal Outdoorsman, a wild hog rifle needs the ability to make a fast second shot and even a third, fourth, and fifth shot. If the hog is still moving, I'm still shooting. I would never shoot a wild boar with a single shot rifle. I might would shoot one with a bolt action in a caliber such as 308 Winchester with heavy bullets but never with something like a 243 unless I was in an elevated stand, i.e., already up a tree. However, this ol' boy keeps his feet on the ground just like the hogs, so there's no such thing as a bolt action hog rifle.
In my opinion the ideal hog rifle is a semi-auto, not a lever action. You can empty the magazine of a semi-auto and your finger never leaves the trigger and your eye never leaves the sight. That is a heck of an advantage when your target is an enraged boar hog headed for you at a high rate of speed. I would have bought a 30 M1 carbine many years ago for hog hunting but not at their price and not with the low power of the round compared to a 30-30. A Ruger semi-auto in 44 mag or a Ruger Ranch Rifle in 7.62 x 39 mm would both work just fine as hog rifles. But not with my thin wallet! I often thought about buying an AK47 or an SKS, but not only did I not like military-looking black rifles I didn't even like people who liked black rifles. Then one morning my snailmail lady brought me a sale flyer from J & G Sales. It contained an ad for Yugoslavian SKS rifles in 7.62 x 39 mm for $159.95. The ad read, "Excellent to like new condition." The picture with the ad showed a wooden stocked rifle. I had recently ordered a $59.95 Turkish Mauser from J & G Sales. After some work with a Dremel® tool, files, and a hacksaw, I had converted it from a military rifle to a decent looking and great shooting sporting rifle. Maybe I could do the same to a Yugo SKS. . . .
It was a bargain at $159.95, especially compared to a Ruger Ranch Rifle at $750. Degreased and as you see it here, it weighed 9 lbs 7.2 oz. It was a heavy rifle. I disassembled it and degreased it in a non-mentionable, highly flammable solvent. You'll find great disassembly instructions and much more on this rifle at www.surplusrifle.com (dead link) My Yugo SKS is probably the easiest to disassemble rifle I've ever owned. Repairing it should something wear or break ought to be a breeze. But let's look at two problems with my rifle which weren't covered by instructions at www.surplusrifle.com (dead link)
|
)
 Here, after hacksaw work, I have removed the handguard/gas piston for clarity. The long black, angled line in the graphic represents the barreled action. Here, after hacksaw work, I have removed the handguard/gas piston for clarity. The long black, angled line in the graphic represents the barreled action.To actually remove the barreled action from the stock I would have had to remove the trigger guard assembly, which I didn't do for this photo. Note in the picture, right side, how the stock tip hooks under the flange attached to the barrel. To remove the barreled action, it rises out of the stock in the rear and pivots at the flange. Raised, you simply pull it free.
|
|
This barreled action refused to rise in the rear. I had to beat it out of the stock with a hammer. Note the crossbolt shown in the picture, near center, and the crossbolt catch shown above it in the graphic. The catch goes behind the crossbolt, not in front of it. Note the little hook on the catch which hooks under the crossbolt. Note the recoil lug at the rear of the barreled action instead of forward as you'd expect it. Those two lugs, the recoil lug and the crossbolt catch lug, must fit in the space/distance between the inletted wood at the rear of the stock and the rear of the crossbolt. I had to carefully shave wood from the bottom half of the stock's recoil surface so the barreled action would fit. When it changed from an almost impossible fit to a tight fit, I stopped shaving wood. I don't know how the Yugoslavian factory worker installed the barreled action in the stock back in 1966. Maybe with a big hammer.
This after-hacksaw photo shows the gas valve "on." To turn it "off" push the big button in and push it up until it locks in the hole above it. To remove the valve, remove the handguard/gas piston assembly and put the big button in the hole to the left. The button comes out and frees the valve for removal. In this case, the piston housing, shown to the left, pressed against the valve so hard it wouldn't move.
Note the shiny ring around the front of the valve. A couple of swipes with a file removed maybe .001" of metal and freed the valve. The piston housing was pushing it against the valve housing and binding it. I can now wiggle the handguard/piston assembly. Before, I couldn't. It took me a couple of days of fitting, filing, trying, etc., to get this rifle functioning perfectly. My son-in-law and I had a discussion on why the rifle would have left the factory with defects, i.e., very poor stock to barreled action fitting and a non-operating gas/grenade launcher valve. Here's our conclusion: any company of soldiers, even in the jungles of Vietnam, would have had at least one man with mechanical ability and a file, the only tool really needed to fix both defects. The communist factories turned these rifles out by the thousands and probably left final fitting to the guys in the field.
Here in 2006 and not 1966, this guy in the field was ready to break out the hacksaw and start chopping off military parts. Here's the before-hacksaw business end of the rifle. On the left and horizontally, and from top to bottom, we see the folded down grenade launcher sight, the barrel, the cleaning rod, and the folded under bayonet. On the right and horizontally we see the grenade launcher.
Hacksawing off the grenade launcher gave me a new barrel length of 21". The observant will notice the tip of a red fiber optic sight poking past the end of the Yugo front sight. That's the Fire Sight front half of a Williams SKS set which didn't even come close to fitting this SKS rifle. Obviously, either the Yugo or the Yugo with grenade launcher version has shorter sights than regular SKS rifles. In this case, about .125" shorter.
The small black hole at 1 o'clock inside the epoxy-filled hole should be in the center of the epoxy-filled hole. The screw provided with the Williams set fits inside the big hole and screws into the small black hole in the sight blade. If you'll notice, that would put the blade about .125" lower. The blade also sits too far to the right, but that is my fault. I wasn't paying attention to details. At first I installed the front blade with the Williams screw, in the lower, proper position, and I installed the rear WSKS peep as per the directions. However, when I tried to zero the rifle with the Wolf 124 gr HP ammo I also ordered with the rifle, it shot about 8" high @ 25 yards. The rear peep was way too high. With the aid of a file and the removal of much aluminum from the bottom of the rear sight, I finally lowered it. It shot to the sights @ 25 yards. Hurray!!
But the sights were so low the Line Of Sight almost touched the rear of the action hump. A ghost image of the hump appeared in front of the rear aperture. And I had to scrunch my
So I raised both sights. Now, my cheek touches the stock and my eye naturally aligns with the rear aperture. And there's no ghost image. The LOS runs about 5/16" above the rear hump. The center of the front sight now sits 1.4" above the centerline of the bore. Note: with the original, low LOS with the factory sights and also with the Williams sights installed as per directions, I highly suspect the gas valve button in the "off" position would have blocked the LOS. With the sights raised, there's plenty of clearance. This close up of the front Fire Sight looks down the barrel as the aiming eye would see the sight. For some reason, the flash made the red Fire Sight look yellow. Notice the gobs of epoxy. Notice the sight hood cut out at the top. I bent the sides of the hood inward hoping the sight would have enough room at the top, but it didn't. So off came the top of the hood. I like it cut off at the top. While we're looking at the front Fire Sight, notice its width, exactly .100". It covers about 6" @ 50 yards. That is bad for group shooting but good for fast target acquisition in a close range woods hunting situation. Read that perfect for wild hog hunting in the woods.
I ran out of elevation adjustment, so the shiny round thing you see beneath the screw is a shim. Actually, it's the cup of a fired primer. It was a perfect fit and just the right thickness. I also had to bend the sight base to position the aperture parallel to the bore, as you see it here. I got to wondering why my view through the aperture was slightly oval shaped. Then I noticed it pointing downward. It actually pointed to a spot some 6" behind the front sight. Of course, the rifle was zeroed with the oval shaped view, so after correcting for parallelism I had to zero it again. With all the trouble I had with the sights I probably shot 100 Wolf rounds before getting the sights in a permanent position.
You can't tell by looking but I hammer-flared the sides of the WSKS aluminum sight so it fit tightly inside the steel SKS sight rails. Before, there was maybe .030" of side to side movement. Now, there's maybe .001". While we're looking down at the partially obscured serial number on the bolt carrier, I should note that all numbers on the rifle matched perfectly, including the serial number on the stock. Now, let's look at two OEM parts I installed on the rifle.
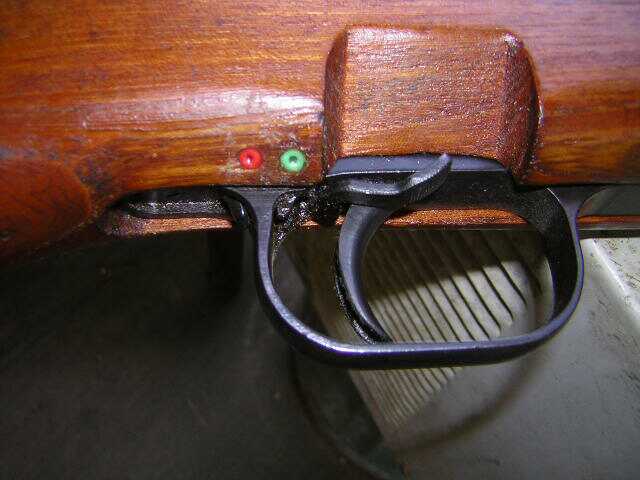
The instructions say "Easy Do It Yourself Installation" and they speak the truth. Just follow the directions. Any Vietnam vet will describe for you the distinctive sound of an SKS firing. It's a powclang, powclang, powclang as the rifle fires pow and recoil drives the bolt and carrier back where they slam into the rear of the receiver clang. Well, this little buffer stops the metal bolt and carrier from hitting the metal rear of the receiver and changes the sound to a plain ol' pow, pow, pow. With this buffer installed, the rifle should last many more years. And it's much more comfortable to fire, too. Get one! The next part is a spring loaded firing pin and cost $37 and was not so easy to install. However, it's a safety issue if your SKS doesn't have one. Get one from Murry Gunsmithing at www.murraysguns.com If you're afraid to tackle the job, send your bolt to Murray for installation for only $6 more. The SKS factory firing pin sits inside the bolt under no spring tension. When the bolt slams shut, inertia sends the firing pin forward where it smacks against the primer. (In the photo below, the primer would be to the left.)
The installation problem is the retaining pin shown at the top center of this photo and sticking out of the bolt. To the left of it is the extractor, then down we see the bolt, then the old firing pin, then the new spring loaded firing pin, then an extra spring Murray sends you. The retaining pin retains both the extractor and the firing pin. It is held in the bolt by a tight fit. A tight fit. Here's my removal suggestions:
) Well, we're through with the hacksaw and the OEM parts and most of all we're through with the danged sights. Here's the finished rifle, the "after" photo.
Well, we're through with the hacksaw and the OEM parts and most of all we're through with the danged sights. Here's the finished rifle, the "after" photo.
The rifle is still too heavy by at least a pound. I considered a plastic—black!—stock, but it weighed exactly the same as this wooden stock, 2.16 lbs. I could chop more iron from around the front sight. We'll see about that come spring and the beginning of warmer weather and the end of hog hunting. Until then, I'll tote it as it is. Now, let's see how the rifle shoots. I shot many 3 and 5 shot 50 yard groups with the Wolf 124 gr HP ammo while working on the sights. The 50 yard groups averaged around 2 1/2" to 3" with some 3 shot groups running around 1". I considered those results great, especially with the big front Fire Sight. The rifle, I then knew, would work fine at woods ranges of probably 75 yards max for a long shot. I shot 5 of the Wolf rounds over my Chrony. The results:
Well, the rifle shot the cheap Wolf ammo just fine. But this rifle would shoot cast bullets if it stayed in my house. When I ordered it (August 9, 2006 & delivered to my FFL dealer on August 14, 2006) in the back of my mind was the thought of selling it and recouping my money if it wouldn't shoot cast bullets. First, I both slugged the bore and measured the twist in order to determine what size cast bullet I needed.
I had two 311041 versions on hand:
I broke out the fat 311041 mold and quickly cast a pile of bullets. You gotta love those Lee 6-cavity molds! I had high hopes for this bullet in my SKS due to the larger diameter better fitting the .3115" bore. Here's the average fat 311041 naked results:
Obviously the fat bullet had much greater potential in my Yugo's bore than the skinny one. I would save the skinny ones for 30-30 use, I decided. But since I had a bunch of reject skinny ones I saved for some reason, I would use them for working up a load.
The 311041 @ 1700 fps was my usual hog load in 30-30. If I could achieve 1700 fps with that bullet in my Yugo, I would in effect have a semi-auto 30-30. I liked the idea!! The photo on the right shows a 311041-loaded 7.62 x 39 mm and a 311041-loaded 30-30 Winchester. Due to my Yugo's long throat I could seat the bullet out to a COAL of 2.143". It's crimped in the first lube groove. As you can tell from the photo below, seating the bullet out leaves plenty of case capacity. About all that sticks below the case neck is the gas check.
The 23.0 grs of S4895 gives an estimated Loading Density of about 95%. I installed my Chrony in my back yard, just out the back door. I hung a t-shirt on my back porch clothesline.
Using the 1.8cc dipper, not weighing the charge, and a skinny 311041 reject bullet, I loaded one only round, then walked out on the back porch and fired it. The casing hit the t-shirt and fell at my feet. A glance over to the Chrony readout showed 1704 fps. I probably hollered with joy! The case showed zero pressure signs. Four more rounds loaded and fired one at the time showed the same results—no pressure signs, 100% ejection, and around 1700 fps muzzle velocity. Here's the Chrony results:
Now you know another reason I put fingernail polish on the rear sight adjustment screws when I finished adjusting POI. There's no reason to change them when I switch ammo types! I think I like my semi-auto "30-30." Here's what I like about it:
The 100° days of August had ended in north Louisiana, and we reached September with cool nights and mid-80° days. I'm an early riser, around 0500, and each morning I had watched the outside temperature gauge on the ol' atomic clock on the wall. Morning by morning it crept closer and closer to the magic number of 60°. When it reached it, I was taking the Yugo hog hunting. It finally reached it, reading 59.9°. But I lollygagged around more than normal, preparing for the first hunt of the season, so when I stopped my truck in the river bottom my watch read 0737, at least an hour later than I should have arrived. I had only two hours of hunting at the most before the temperature grew too hot for one slow man to clean a hog. I got out of the truck, suddenly shivering in the cold. I wore only a t-shirt and wished for an overshirt.
The road leads off to the left. There's nothing for scale, but the giant oak is about 4 feet in diameter. I loved the way the morning sun illuminated it, so I snapped the photo, then stood there for a long minute and admired the beauty. Behind the oak and noticeable in the full size photo you can see an opening. That's an ancient river channel, now a nearly dry slough which stretches about 300 yards to the left. The river is just beyond the treeline in the rear of the photo. Since it's too early for acorns, hogs feed on grass growing in the moist ground near the slough and in the slough itself on mussels made accessible by low water conditions.
I believe this mussel is a "Fragile Papershell" species Leptodea fragilis. The hogs probably call it tasteosis morselosis. All hunts begin with a plan and this first one with the Yugo was no exception. I had intended to arrive at the crack of dawn and catch the hogs leaving the slough and heading to their daytime bedding grounds in the pine tree plantation off to the left of the dim road. The slough lay in the transition zone between two dissimilar land patterns—hardwood bottomland and upland pine plantation land. Such transition zones make ideal hunting grounds due to animals moving back and forth between two totally different ecosystems with many different food sources all ripening, maturing, or becoming available at different times of the year. For hogs, the bottomland provides acorns, shagbark hickory nuts, wild hazelnuts, muscadine grapes, ‘possum grapes, persimmons, mayhaw berries, and many other foods such as mussels. The pine land provides blackberry leaves and berries, numerous tubers, and plentiful grubs and earthworms beneath the thick ground covering of dead pine needles. There's many other foods I'm sure. Hogs, and deer, eat here this month, over there next month, and way over yonder the month after that. Then they're back here eating something entirely different. Well, here and now, I was ready to start hunting. I put up my camera, hitched my pack, and prepared to take a step. The sun beamed into my eyes, so I turned down the brim of my hat. Doing that, my eyes cast downward. There at my feet was a fresh hog track. It looked about 1 1/2" long, like a teenager-size hog, like the exact size of the hog I hoped to kill. A hog with a ham like I had promised my sister I would bring home soon and roast over my front yard campfire. My entire being suddenly focused on my surroundings. I became a hunter. The woods were absolutely still, and cool. I heard a bird . . . Then another one. . . I began easing along the old road. About 100 yards down it, there lay a little pile of hog poop. Around it were more teenager tracks and some much bigger tracks—the kid's mother, I figured. I stopped for a few minutes, watching, listening. I started walking again, very slowly. Many yards and minutes and stops later, a bluejay screeched off to my left. I eased forward while the bluejay kept up his racket. He was mad at something, probably a squirrel or a deer . . . but maybe a hog. I stopped and looked and listened. Nothing. I moved forward. Several yards later and off to my left a deer snorted—at me, probably, but maybe at the still-mad bluejay. I tried hard but couldn't see the deer. I would not shoot it as the season wasn't open, but I wanted to see it. Nothing. I eased forward again. Eventually I made it to one of my regularly scheduled gedunk stops, an oak blow-down whose trunk was perfect for sitting and snacking and whose dead limbs provided cover. The time was after 0930, and the temperature was rising fast. I leaned the Yugo against a limb and sat down and dug out my snacks. Working with slow movements so as not to alarm game, I cracked my regularly scheduled hardboiled egg. I peeled it, then tore open the tiny deli-packs of salt and pepper I keep when I get take-out burgers. Damned if I didn't have two packs of pepper. I had put on my glasses specifically when I picked the packs out of my stash at home so I would get both a salt and a pepper. How in tha hell had that happened? While I pondered one of the great mysteries of the universe and munched a hardboiled egg with too much pepper on it, I happened to glance to my right and there stood a deer. I froze. It stood in a patch of sunlight about 90 yards away at the edge of the old road I had walked down. It stood near the spot on which I had stood when I heard it snort. Its summer coat gleamed like gold in the morning sun. It was beautiful. I couldn't tell buck or doe because a low-hanging leafy limb obscured its head. I planned the shot I would have made with the Yugo had the shot been legal. Just center the Fire Sight on its illuminated side and pull the trigger. No need to estimate the range. The Yugo leaned there beside me within easy reach. Just ease my right hand over and pick it up and slowly, slowly bring it to my shoulder. Since I couldn't see the deer's head, he or she probably couldn't see me. Oh, it would be easy. . . . I looked away and took a bite of the hardboiled egg. Chewing, I looked back at the deer. It was gone . . . gone like a golden ghost.
|
)
)
)
)
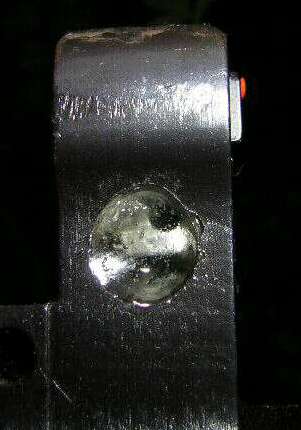 This close up shows it better. As you can see, I finally installed the front Fire Sight with the help of gobs of epoxy.
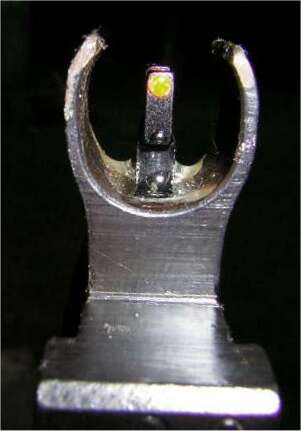
)
)
)
)
)
)
)
)
)