(Click here for the first SKS article.)
(Click here for the second SKS article.)
(Click here for the fourth article.)
Copyright 2014 by Junior Doughty
Click small photos for full size
photos
) Here's my Yugo SKS as it came in the door back in 2006. Let's call this photo Before. Here's my Yugo SKS as it came in the door back in 2006. Let's call this photo Before. It weighed 9 lbs 7.2 oz complete with a folding bayonet, a grenade launcher, a folding grenade launcher sight, and a night sight—lots of iron! I took a hacksaw and a grinder to that iron. The new weight = 8 lbs 5.2 oz. That was tolerable but still too heavy. The main weight problem then, I believed, was the factory stock at 2 lbs 2.6 oz. I kept an eye on eBay and finally found a Russian SKS stock for about $50. I had high hopes it would weigh less than the original stock.
The only problem was poor packing by the seller and a chip knocked out of the forend tip, as you see here. But epoxy fixed that. With very minor pocket knife scraping, the stock fit the barreled action pefectly. At this point I decided to fix two problems with the rifle's sights, one with the front sight and the other with the rear sight. It was time to end sight problems which had plagued me from SKS day #1.
Here we see it as it came in the door in 2006. OA rifle weight here = 9 lb 7.2 oz.
Here we see it after the first hacksaw job in circa 2012. OA rifle weight here = 8 lbs 5.2 oz
Here we see it in February, 2014. The assembly lost 4.4 oz. Including the new and lighter stock, the rifle's OA weight here = 7 lb 7.4 oz. Knocking out the pin to remove the assembly was easy. But knocking the assembly off the barrel was hard, to say the least. I had to get a bigger hammer. After I removed the 4.4 oz of metal, I had to ream the inside of the lightened, shortened assembly to get it back on the barrel. Be forewarned!
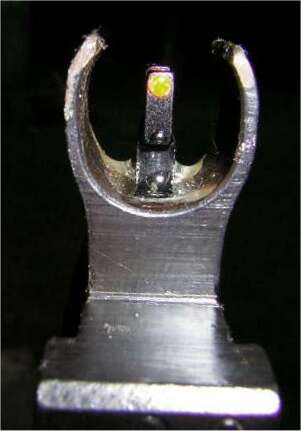
This full-size, non-clickable photo shows the old, too low front sight from the rear. As mentioned in a previous article, the camera flash turned the red fiber optic rod yellow. Notice the curved wings. Notice gobs of epoxy.
This clickable photo shows the new, after weight-loss front sight from the front. Notice the straightened wings. Notice the higher sight. Not seen is the sight centered front-to-rear between the wings. I removed the gobs of epoxy from around the sight by means of holding the sight over a stove burner and charring the epoxy. I had already broken the original fiber optic rod with my bigger hammer, but no problem—a piece of the red fiber optic rods I sell here perfectly fit the Williams sight. NOTE: Send me a SASE and I'll send you for free a piece of 1/16" red fiber optic rod long enough to replace one sight.
Notice three mounting screws along the bottom of the 5D sight instead of the normal two. With the left, 6-48 screw as a pivot, I wallowed out the center hole in order to raise the right edge of the sight so I could level it. After re-countersinking the sight base and re-drilling and re-tapping the original 6-48 hole in the receiver, the center screw is now an 8-40 x 1/2" T-10 Torx screw. There's a good reason I didn't put the original 6-48 screw in the center hole. The original hole, drilled by yours truly, was drilled shallow for the original short 6-48 Williams screw. Since I couldn't re-drill a tapped hole to a greater depth so I could install a longer screw, I used a short 6-48 T-10 Torx replacement. A heavy hand on the Torx bit stripped the internal threads. Thus the 8-40 replacement screw. The 8-40 threads over the original 6-48 threads are light, yes, but there's 10+ new 8-40 threads inside the receiver. There's a lug on the other side of the receiver in that spot, and the 8-40 x 1/2" screw has circa 15 threads purchase in the side of the receiver and in the lug. It's torqued down to the max, too. If anyone is contemplating a 5D, etc., sight for their SKS, I strongly advise positioning it on the receiver so you can install a much longer mounting screw into that lug. The added mounting screw on the right is a 5-44. If you wonder why I used a 5-44 screw instead of a stronger 6-48 screw, it's due to the close proximity of both the receiver top edge and the edge of the cover latch pin hole. By the way, that latch pin is recessed so there was no need to shorten it. It doesn't touch the 5D base. The original, leftward 6-48 screw was replaced with a new, too long 6-48 screw, and I trimmed it even with the inside receiver wall. The rightward 5-44 screw was also too long and was trimmed even with the inside of the receiver wall. Both screws now have maximum thread purchase. The 5D mount now has three mounting screws instead of two. Believe it or not, I considered installing a fourth mounting screw in the space between the 8-40 Torx screw and the 5-44 slotted screw. I would have used a countersunk 6-48 Leupold T-15 Torx screw which I sell here. That option is still open if I need it. . . . After much file work on the back of the mount, it is now clearanced .005" to the receiver cover instead of the original .002". It has two mounting screws with maximum thread purchase and one oversized, heavily torqued mounting screw with more than enough thread purchase. It ain't goin' nowheres! As the elevation stop screw on the slide was too short due to the raising of the slide, it's now a 6-48 x 3/4" with adjustment room.
After around
And here's the After picture.
The OAL is now 39". The barrel length is 19 1/4". It weighs 7 lb 7.4 oz or almost 2 lb less than when it came in the door. Even with a sling and 10 rounds in the magazine, it weighs less than 8 lb. I may de-oil the forearm wood and paint it OD green. Then again, I may not. Some OD green paint would be nice on the side of the bolt and the carrier. That I believe I will do.
|
)
)
)
)
 The much lightened front sight assembly is now easier to remove and replace in its original position on the barrel. Just knock out the pin, give the rear of the sight a tap or two, and off it will slide. I don't know why I would want to remove it, but it's good to know it's easy to do.
 )
)
)